(wait, is everyone in the artist alley a con artist?!)
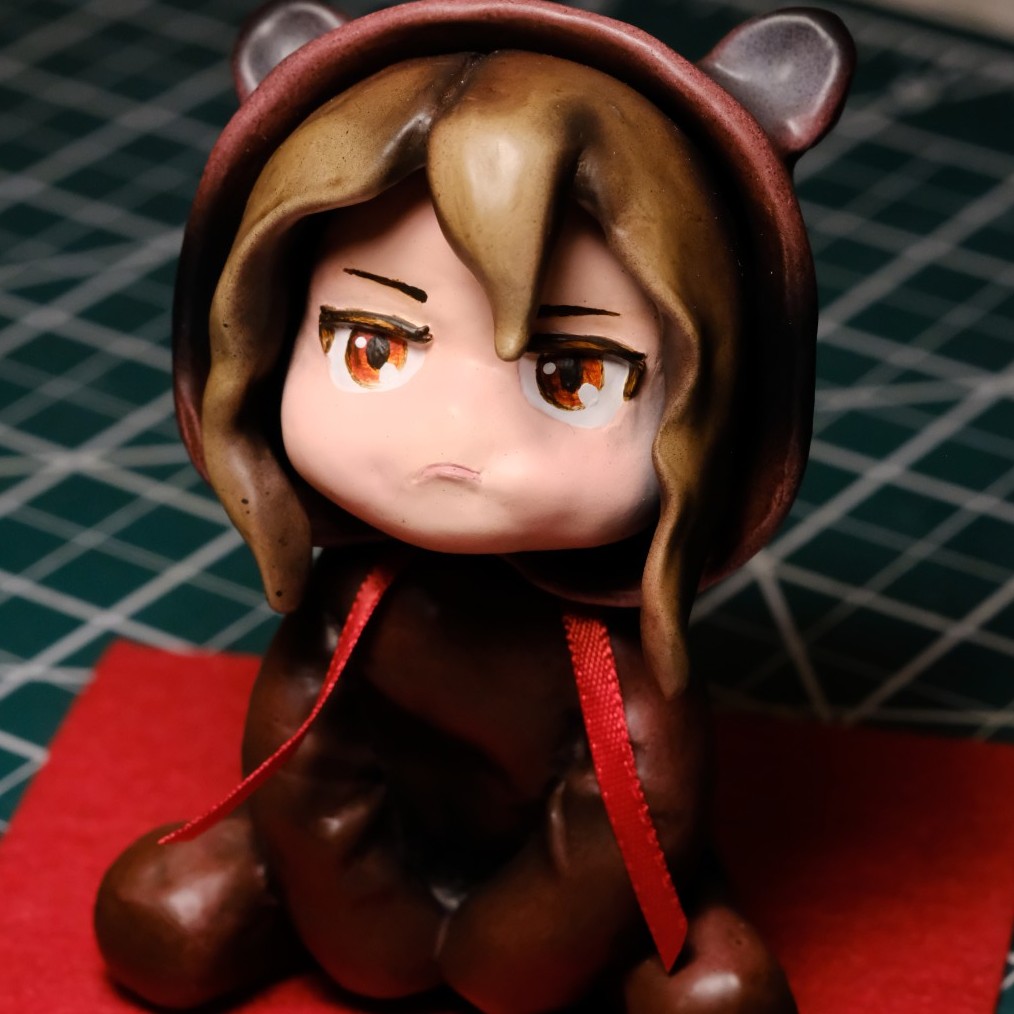
I’m back from Vancouver and from Anirevo, and what a great time it was! I tabled on Friday and then spent the weekend just absorbing the con vibes. But we’ll get back to that… First, let’s take a look at Tanuki-tan! Renamed from Mochi Tanuki Daifuku, because let’s be real, that was always a terrible name.


Yes, I actually managed to finish her in time for the con! I even managed to get a few kits assembled and painted to sell as finished figures. And all it took was too many late nights spent sculpting, molding, sanding, and painting, followed by too many days of half-falling-asleep at work because I didn’t get enough sleep. You do what do gotta do…
For this sculpt, it was time to bust out a new medium: wax! Yes, after starting them in clay, I ended up finishing off the face and hair in Azbro wax. This was my first time working with the stuff, and like a gateway drug I think I’m already addicted. For small details, it’s just so nice to work with!

I started off with clay versions of the head parts (which you can see above). From these I made molds, which I then used to cast wax copies of the clay prototypes. It took me a couple of tries to get this process right. You have to melt the wax and then fill the mold while it’s still liquid. Sounds simple! So naturally, it gave me problems. 😒
The wax kept solidifying before it had actually filled all the space in the mold, leaving me, after several pours, with a series of half-parts that were all missing the tips of the hair. If I wanted Tanuki-tan to have a haircut, I would have given her one in the first place! Thankfully, one of the other benefits of wax is that you can simply melt it back down and re-pour it as many times as you need to. What I ultimately figured out is that the mold needs to be heated up beforehand to help the wax stay liquid long enough to fill everything. A couple minutes in the microwave seemed to do the trick for me, although I’m sure that timing depends on the size of the mold and the thickness of its walls.

To be honest, I probably could have stopped at the clay if I really wanted; it got me 90% of the way to the final product, and I only performed slight refinements after switching to the wax pieces. It was good practice, though, and now I feel comfortable tackling something more complex with wax. Besides, for thin parts like the hair, clay just can’t quite hold its shape well enough to be confident that the final cast will end up in the same form that the prototype was in. Thin sections like to droop and warp. Wax, on the other hand, is quite hard. Definitely no drooping problems here! And now that I read those last two sentences back, it sounds like I could be talking about… something else. Never mind that. 😶

You can see in the above picture where I applied a bit more clay to the wax to fix the fitment, which had changed between the prototype and the cast copy. I did the same with the head, adding some clay to the wax cast to fit it to the hood. The two materials look similar, but the wax is a little more orange than the clay.

Of course, the flip side of wax’s hardness is that the material is also quite brittle. I cracked and broke the hair part several times and in several places, first while removing it from the mold and then repeatedly when working the sculpt. Thankfully, it wasn’t hard to fix. I just welded the seam back together with a wax pen (a little pen with a heating element on the end for precise wax-melting) and then smoothed it over, and it was like nothing ever happened! Speaking of smoothing, another benefit of wax is that you can sand and file it, which is enormously helpful in achieving a more refined finish on my final prototypes. I can’t deny, I’ve been dissatisfied with the finish on most of the clay parts I’ve made. It’s just too easy (for careless me, at least) to leave accidental marks, whether it’s from tools or fingerprints or what-have-you, and when you think you’ve cleaned one up you examine the part and ten more have cropped up! I think I’ll have a much easier time coaxing smooth surfaces out of wax than I ever did with clay.

Most of the mold-making process was pretty standard stuff that I’ve shown here before, so I won’t dive into it. The only notable thing here is the hood, which has a full through-hole in the neck. I hadn’t tried molding something like this before, but it turned out to be pretty straightforward. When cutting the mold, I just cut though the silicone peg that ran through the neck hole. The remaining peg-halves smooshed down enough to let the hood slide over them and release from the mold without trouble. See, sometimes simple things actually do work!


I ended up with just enough time before Anirevo to prep, assemble, and paint four Tanuki-tans. I didn’t end up making any kits of her, although now that the con’s over I’ll work on a few of those. They should be up on the shop page pretty soon. Anyway, here’s how the paint jobs turned out!
This first one, I guess, is sort of the “default” paint job and the one I’ll probably put on the box art:

I used purple as the accent color for the next one, and changed up the eye style:

This next one used pink and looks a lot more youthful because of it. Also note that I altered the shape of the eyebrows from “angry pout” to more of a sad shape. It’s amazing how much of mood shift you can get just from doing that:

Finally, here’s one I did in blue, white, and black. Just to shake things up a bit, I tried to make the eyes resemble flowers. I rather like how they turned out:

Now let’s talk about Anirevo! I updated my table layout with some of those ubiquitous storage cubes that everyone uses in artist alleys. I tried to make them look like a jewelry display case, and I think I kinda got it! I’m particularly happy with how the lighting turned out. It’s a simple design, just some battery-powered lights shining through translucent squares, but it looks really clean and display case-y.

Overall, I think this is a big improvement over my previous booth design! Much more professional-looking, with the figures elevated to eye level and highlighted effectively. Still, I do feel like it looks a bit bare. I’d like to add a name/logo to the top of the display, and maybe some small cheap items lined up near the bottom or off to the side. To that end, I’m thinking about making some resin keychains… stay tuned for that! Also, I need to get a bigger tablecloth. It would help to actually check the dimensions before buying next time…

As mentioned before, I spent the weekend at Anirevo as a regular attendee. I had a great time overall, hanging out (and spending way too much in) the artist alley, going to panels and Q&As, and enjoying some of the musical performances. My one minor gripe is that it felt like quite a few panels were hitting capacity while there were still people in line, who then had to be turned away. I kinda feel like the con would benefit from adding more panels next time to spread people out a little… but who am I to say? I’m not a con organizer, and like I said, I had a great time anyway. I’d love to do Anirevo again next year, preferably with a full three-day table. As much as I liked having the weekend off to explore the con, I think I’d still value the extra time in the Artist Alley more. We’ll see what happens next year!
Leave a Reply